


How can I use AWS S3 with Pages?
This guide will help you quickly get started with the file upload system built based on AWS S3 and Next.js in EdgeOne Pages.
Start quickly
Deploying with EdgeOne Pages templates is the fastest way to build and deploy AWS S3 projects from scratch. You can quickly find the AWS S3 Batch Uploader theme template in the template market of pages to start deploying.
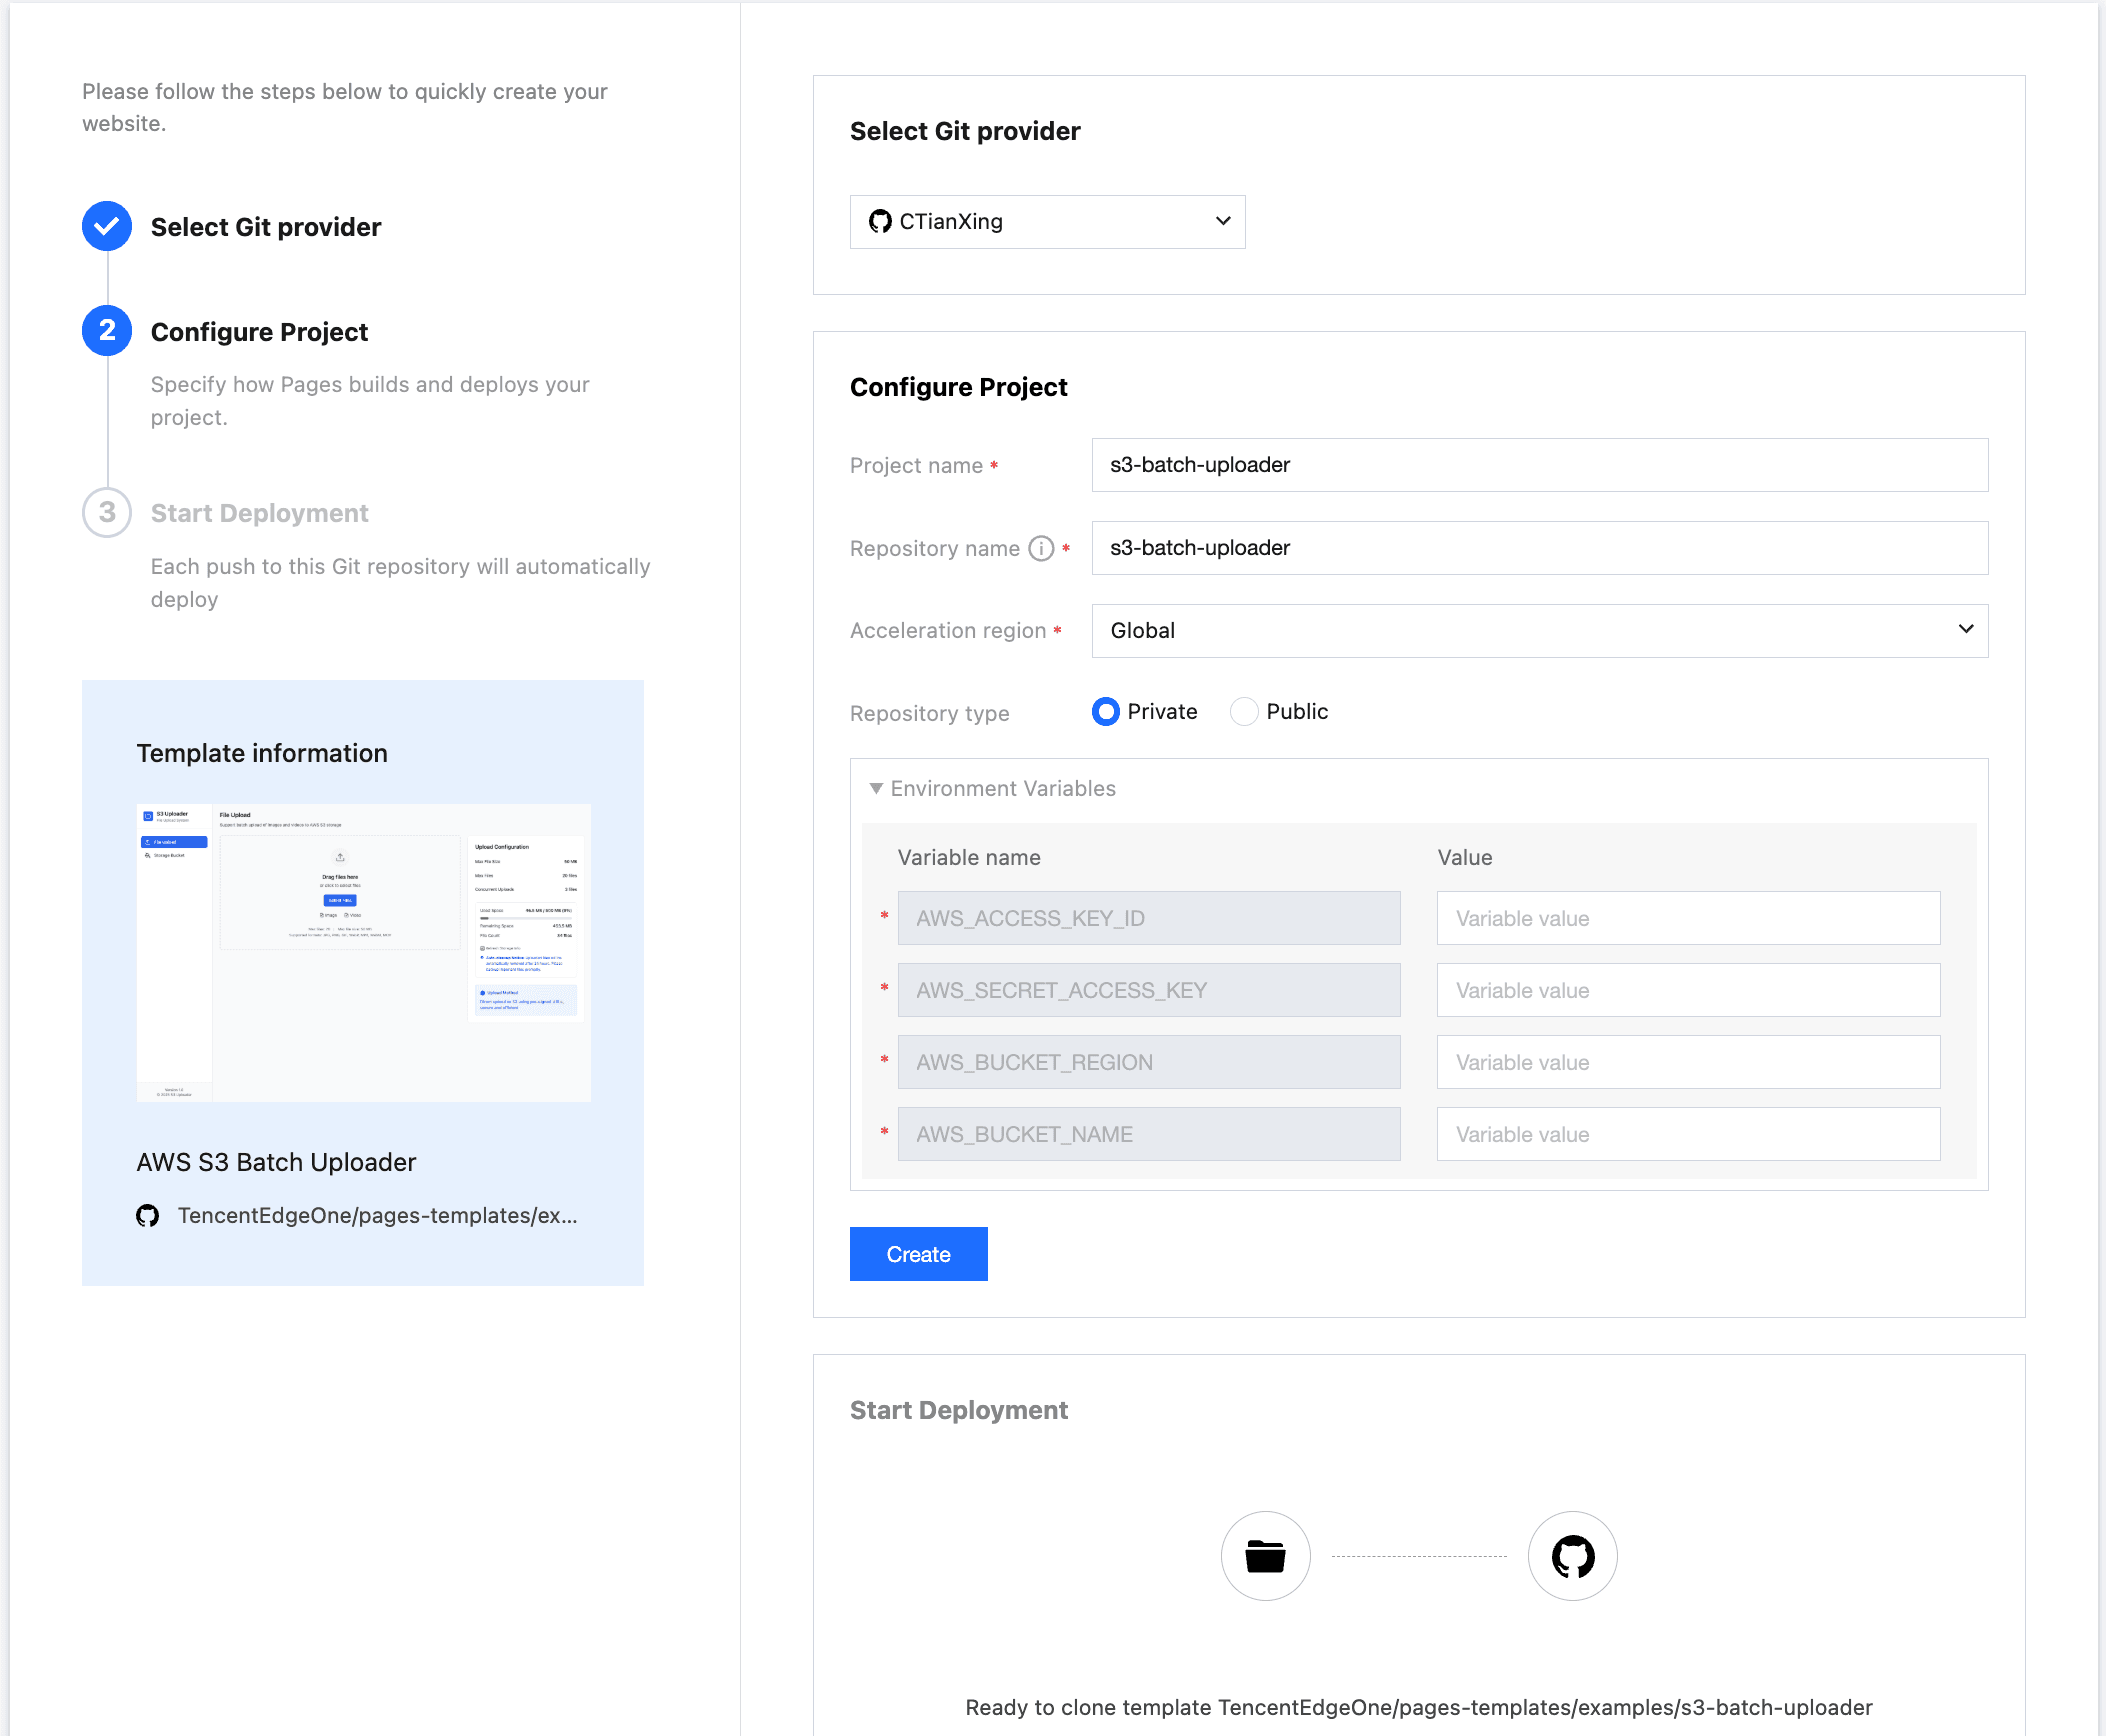
Log in to your AWS S3 account, find Access Key under Personal Center - Security Credentials menu, copy the key to Environment Variables, and fill in the bucket and storage region-related information at the same time. Clicking the "Create" button, Pages will clone the template to your private repository and build it. After the build is completed, you can clone the code from the repository for development.
// AWS access key ID
AWS_ACCESS_KEY_ID=your-access-key-id
// AWS secret access key
AWS_SECRET_ACCESS_KEY=your-secret-access-key
// The AWS region to which this client will send requests
AWS_BUCKET_REGION=your-bucket-region
// AWS bucket name
AWS_BUCKET_NAME=your-bucket-name
Local debugg
Clone the repository to the local machine
git clone https://github.com/TencentEdgeOne/pages-templatesFind the examples/s3-batch-uploader project in the repository pages-templates
Configure the key
Create a.env.local file similar to.env.example in the root directory of the s3-batch-uploader project
Log in to your AWS S3 account. Under the Personal Center - Security Credentials menu, find the access key. Copy and paste the key into.env.local. Note that only change the value in the.env.local file and do not modify the key name; otherwise, the AWS S3 SDK will not be able to initialize correctly.
// AWS access key ID
AWS_ACCESS_KEY_ID=your-access-key-id
// AWS secret access key
AWS_SECRET_ACCESS_KEY=your-secret-access-key
// The AWS region to which this client will send requests
AWS_BUCKET_REGION=your-bucket-region
// AWS bucket name
AWS_BUCKET_NAME=your-bucket-name
Configure the bucket policy
{
    "Version": "2012-10-17",
    "Statement": [{
        "Sid": "AllowAccessFromSpecificReferers",
        "Effect": "Allow",
        "Principal": {
            "AWS": "arn:aws:iam::id:root"
        },
        "Action": [
            "s3:DeleteObject",
            "s3:GetObject",
            "s3:ListBucket",
            "s3:PutObject",
            "s3:PutObjectAcl"
        ],
        "Resource": [
            "arn:aws:s3:::your-bucket-name/*",
            "arn:aws:s3:::your-bucket-name"
        ]
    }]
}
Copy the above strategy to your bucket policy. You can find the bucket Policy in the bucket Permission configuration menu.
"Principal": {
            "AWS": "arn:aws:iam::id:root"
        }
Replace the id in the above Principal.AWS value with the ID of your account
"Resource": [
            "arn:aws:s3:::your-bucket-name/*",
            "arn:aws:s3:::your-bucket-name"
        ]
Replace the "your-bucket-name" in the above Resource array with the actual bucket name
Configure CORS to allow uploads from browsers
[
   {
       "AllowedHeaders": [
           "*"
       ],
       "AllowedMethods": [
           "GET",
           "PUT",
           "POST",
           "DELETE"
       ],
       "AllowedOrigins": [
           "*"
       ],
       "ExposeHeaders": []
   }
]
Copy the above content to the Cross-Source Resource Sharing (CORS) of the bucket. You can find the Cross-source Resource Sharing (CORS) in the bucket permission configuration menu.
Install Node.js 18.x
This project is developed based on Next.js 14, so the minimum supported version of Node.js is 18.x
Start the project
npm install
npm run dev
The template runs at http://localhost:3003
Choose to upload pictures or videos. At this moment, you should be able to see that the file upload has been successful.
The page supports two file upload methods:
- Click Upload: Click the Upload button and select the local file
- Drag-and-drop upload: Simply drag the picture or video to the designated area to complete the upload
The system will automatically match the optimal upload plan based on the file size
- Shard upload: For large files (> 50MB), multi-threaded concurrent transmission is adopted, automatically splitting file blocks and significantly improving transmission efficiency
- Pre-signed URL: Suitable for small document transmission (typically ≤50MB), it achieves secure and efficient direct transmission through a temporary encrypted link
Core Principles Introduction
Principles of Automatic Optimal Upload Matching
const BUCKET_NAME = process.env.AWS_BUCKET_NAME!

if (fileSize > 50 * 1024 * 1024) {
			const createMultipartCommand = new CreateMultipartUploadCommand({
				Bucket: BUCKET_NAME,
				Key: key,
				ContentType: contentType,
			})

			const multipartResponse = await s3Client.send(createMultipartCommand)

			return NextResponse.json({
				uploadId: multipartResponse.UploadId,
				key,
				publicUrl: `https://${BUCKET_NAME}.s3.${process.env.AWS_BUCKET_REGION}.amazonaws.com/${key}`,
				multipart: true,
			})
		} else {
			// Presigned URL for direct upload
			const command = new PutObjectCommand({
			Bucket: BUCKET_NAME,
			Key: key,
			ContentType: contentType,
		})

		const uploadUrl = await getSignedUrl(s3Client, command, {
			expiresIn: 300, // 5 minutes, consistent with other presigned URLs
		})

		return NextResponse.json({
			uploadUrl,
			key,
			publicUrl: `https://${BUCKET_NAME}.s3.${process.env.AWS_BUCKET_REGION}.amazonaws.com/${key}`,
			multipart: false,
			fields: {}, // Direct presigned URL doesn't need additional fields
			})
		}
Pre-signed URL Mechanism
import { NextRequest, NextResponse } from 'next/server'
import { GetObjectCommand } from '@aws-sdk/client-s3'
import { getSignedUrl } from '@aws-sdk/s3-request-presigner'
import { UPLOAD_CONFIG } from '../../../config/upload'
import { s3Client, BUCKET_NAME } from '../../../lib/s3-client'


/**
 * Generate presigned download URL for a single file
 *
 * @param request - Request object containing the following parameters:
 *   - key: S3 object key (file path)
 *   - expiresIn: URL expiration time (seconds), optional, defaults to config value
 *
 * @returns JSON response containing:
 *   - presignedUrl: Presigned download URL
 *   - expiresIn: URL expiration time
 *   - key: Original file key
 */
export async function POST(request: NextRequest) {
  try {
    // Parse request parameters: file key and expiration time
    const { key, expiresIn = UPLOAD_CONFIG.PRESIGNED_URL_EXPIRES } = await request.json()

    // Validate required file key parameter
    if (!key) {
      return NextResponse.json(
        { error: 'Missing key parameter' },
        { status: 400 }
      )
    }

    // Create S3 GetObject command for generating download URL
    const command = new GetObjectCommand({
      Bucket: BUCKET_NAME,
      Key: key,
    })

    // Generate presigned URL, allowing temporary access to S3 object
    const presignedUrl = await getSignedUrl(s3Client, command, {
      expiresIn: expiresIn,
    })

    // Return presigned URL and related information
    return NextResponse.json({
      presignedUrl,
      expiresIn,
      key,
    })
  } catch (error) {
    // Log error and return server error response
    console.error('Error generating presigned URL:', error)
    return NextResponse.json(
      { error: 'Failed to generate presigned URL' },
      { status: 500 }
    )
  }
}
Q&A
Can a folder be uploaded?
Currently, the template does not support direct folder upload, but you can:
Select all the files in the folder
2. Batch drag to the upload area
3. Upload all files at once
Where are the uploaded files stored?
The files are stored in the AWS S3 cloud storage service, and the specific location is determined by the configured bucket. After a successful upload, you will receive an S3 URL through which you can access the file.
How to delete uploaded files?
The current template only supports removing individual file records from the upload list and does not support batch deletion. If you need to delete S3 files in batches, please contact the administrator or use the AWS console.
Can the upload be resumed after it is interrupted?
The template currently does not support resuming from breakpoint.