


aws s3와 pages 를 어떻게 함께 사용합니까?

이 안내서는 AWS S3 및 Next.js 를 기반으로 한 파일 업로드 시스템을 EdgeOne Pages 에서 빠르게 사용할 수 있도록 도와줍니다.
빠른 시작
Edgeone Pages 템플릿 배포는 AWS S3 프로젝트를 처음부터 빌드하고 배포하는 가장 빠른 방법이다. AWS S3 Batch Uploader 테마 템플릿을 찾아 pages 템플릿 마켓에서 배포를 시작할 수 있다.
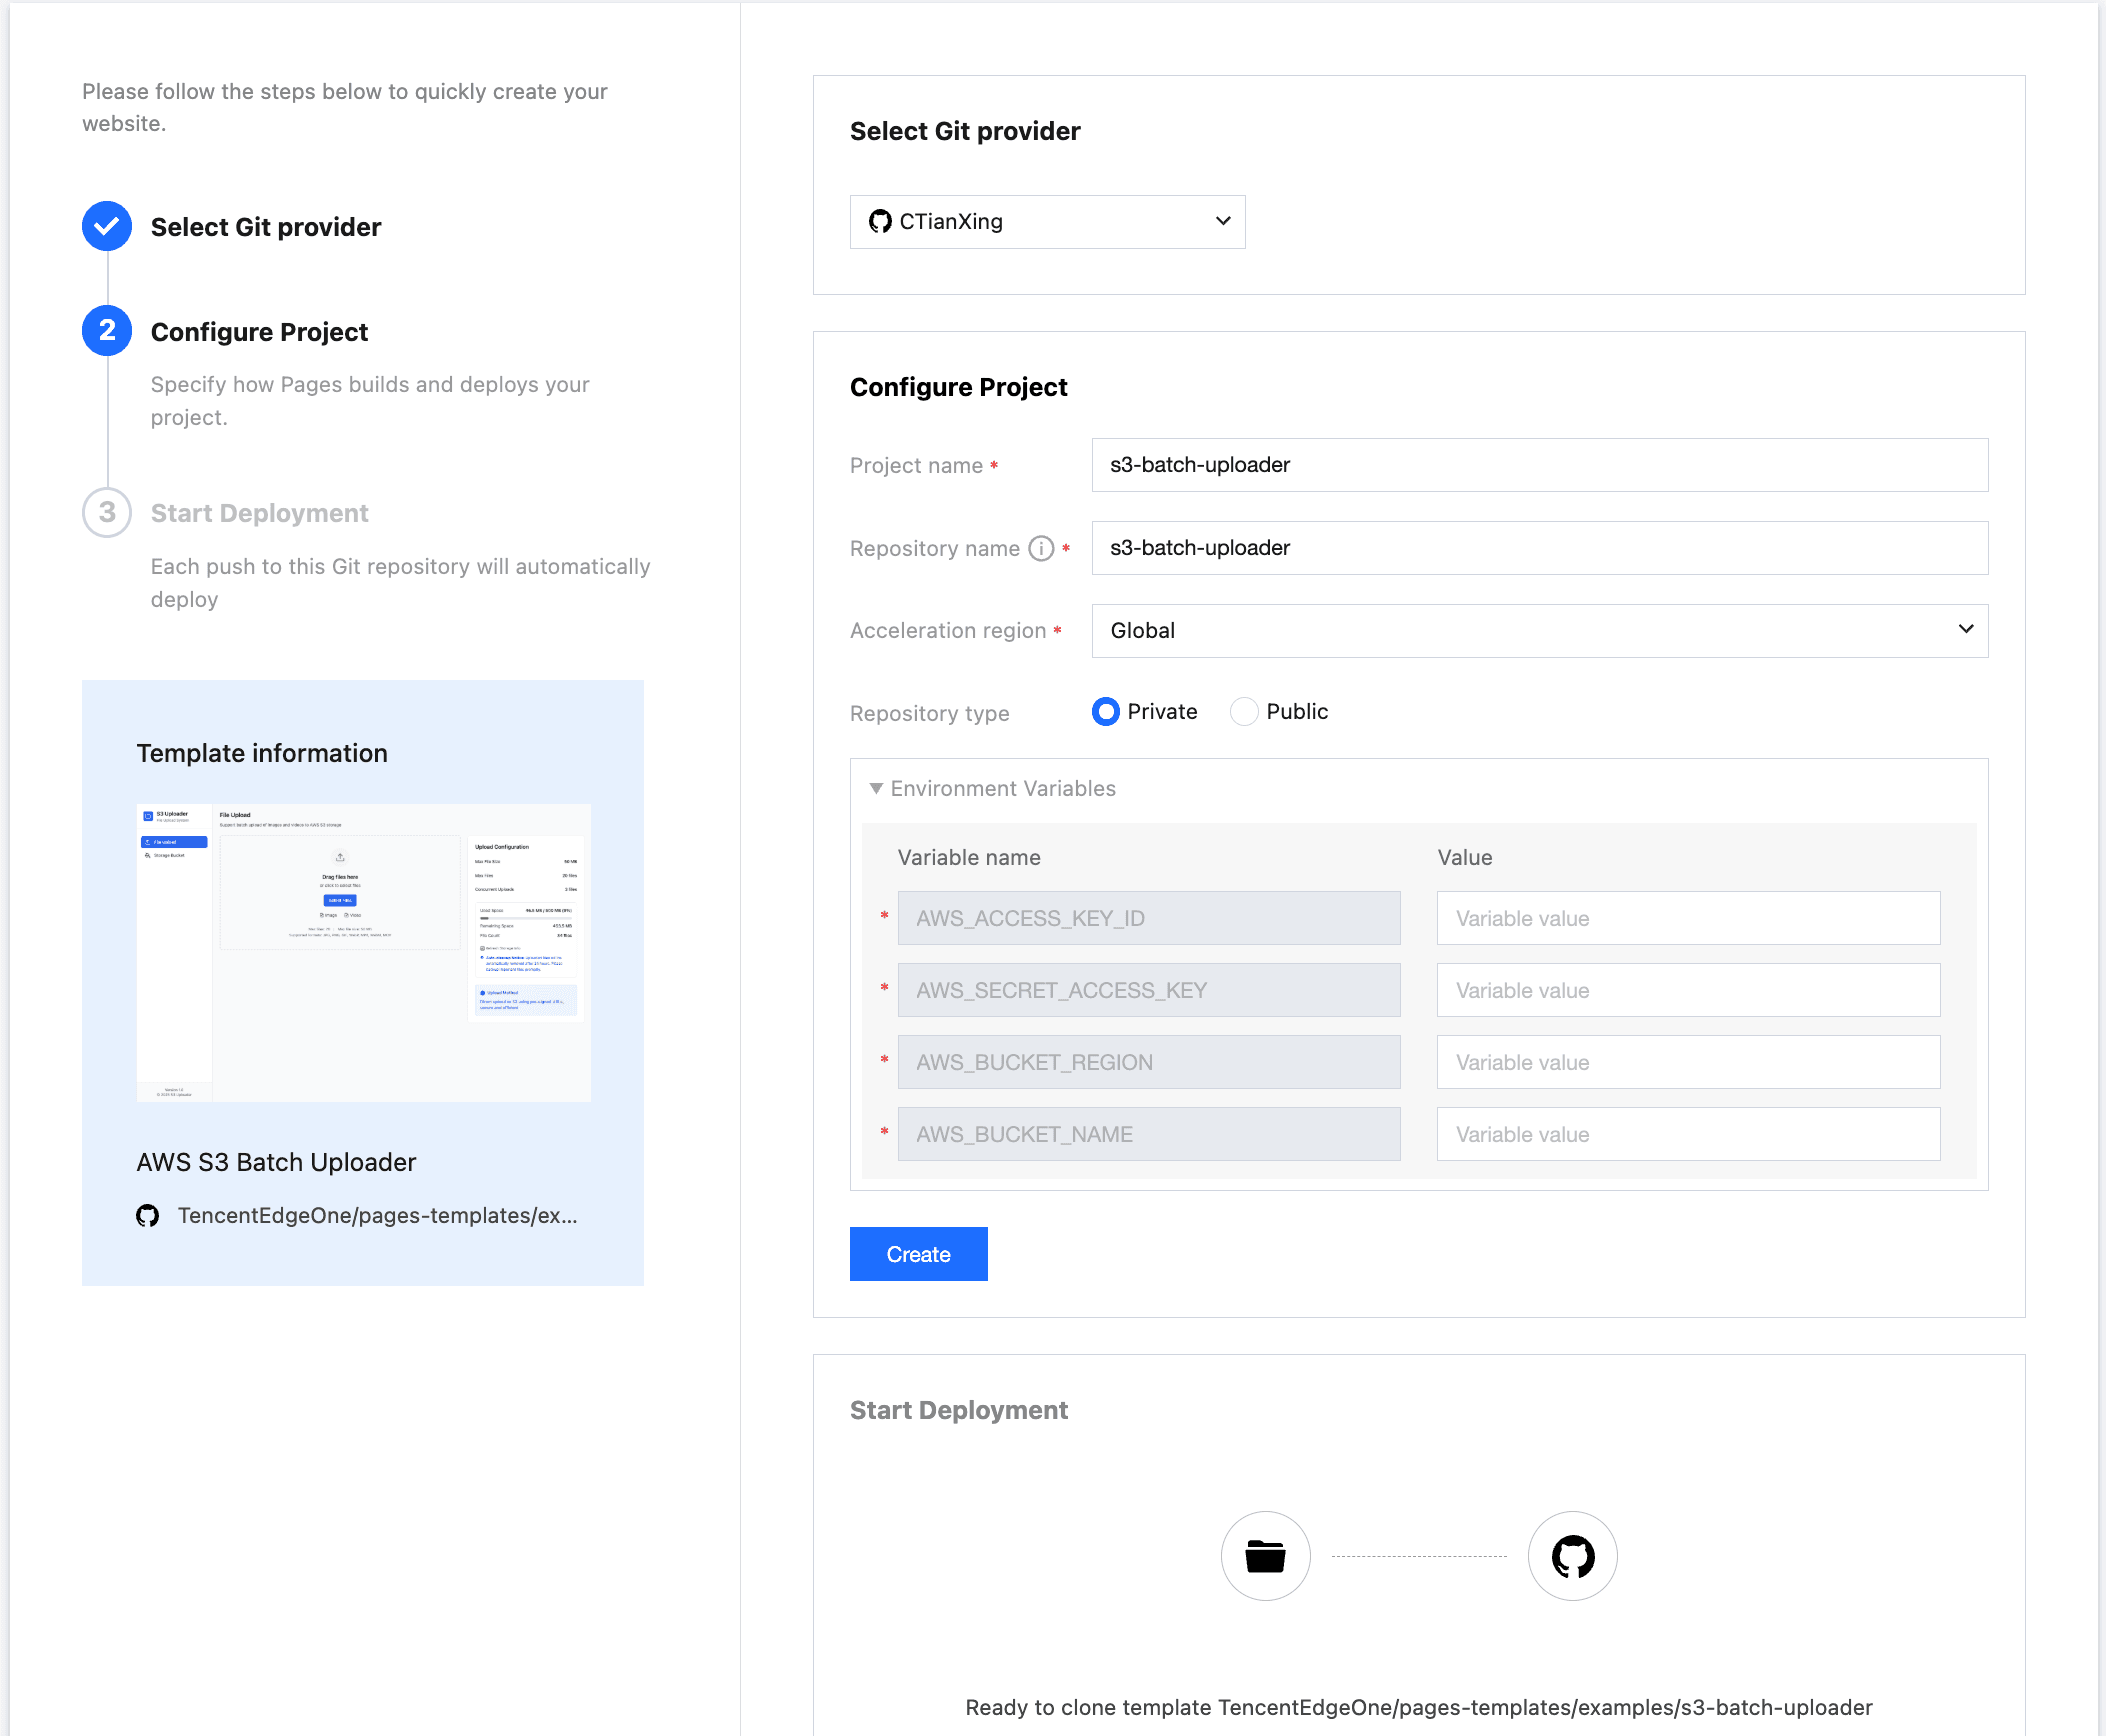
AWS S3 계정에 로그인하여 개인 센터-보안 인증서 메뉴에서 접근 키를 찾고, 이를 Environment Variables에 복사하고 버킷과 스토리지 지역에 대한 정보를 입력한다. Create 단추를 누르면 Pages 가 템플릿을 개인 저장소에 클론하여 빌드한다.빌드가 완료되면 저장소에서 코드를 복제하여 개발할 수 있다.
// AWS access key ID
AWS_ACCESS_KEY_ID=your-access-key-id
// AWS secret access key
AWS_SECRET_ACCESS_KEY=your-secret-access-key
// The AWS region to which this client will send requests
AWS_BUCKET_REGION=your-bucket-region
// AWS bucket name
AWS_BUCKET_NAME=your-bucket-name
로컬 디버그
저장소를 로컬로 복제
git clone https://github.com/TencentEdgeOne/pages-templates저장소 pages-templates 에서 examples/s3-batch-uploader 프로젝트를 찾을 수 있다
AWS 키 구성
s3-batch-uploader 프로젝트 루트 디렉터리에 .env.example 과 유사한 .env.local 파일을 만든다
AWS S3 계정에 로그인해서 개인 센터-보안 인증서 메뉴에서 접근 키를 찾아 .env.local 로 복사해서 붙여넣으십시오 .env.local 파일의 값만 변경됩니다. 키 이름은 변경하지 않으면 AWS S3 SDK 를 제대로 초기화할 수 없습니다.
// AWS access key ID
AWS_ACCESS_KEY_ID=your-access-key-id
// AWS secret access key
AWS_SECRET_ACCESS_KEY=your-secret-access-key
// The AWS region to which this client will send requests
AWS_BUCKET_REGION=your-bucket-region
// AWS bucket name
AWS_BUCKET_NAME=your-bucket-name
버킷 정책 구성
{
    "Version": "2012-10-17",
    "Statement": [{
        "Sid": "AllowAccessFromSpecificReferers",
        "Effect": "Allow",
        "Principal": {
            "AWS": "arn:aws:iam::id:root"
        },
        "Action": [
            "s3:DeleteObject",
            "s3:GetObject",
            "s3:ListBucket",
            "s3:PutObject",
            "s3:PutObjectAcl"
        ],
        "Resource": [
            "arn:aws:s3:::your-bucket-name/*",
            "arn:aws:s3:::your-bucket-name"
        ]
    }]
}
버킷 정책을 버킷 권한 설정 메뉴에서 찾을 수 있는 버킷 정책으로 위 정책을 복사합니다.
"Principal": {
            "AWS": "arn:aws:iam::id:root"
        }
위의 principal.aws 값의 id를 귀하의 계정의 id로 바꿉니다
"Resource": [
            "arn:aws:s3:::your-bucket-name/*",
            "arn:aws:s3:::your-bucket-name"
        ]
resource 배열에서 your bucket-name을 실제 버킷 이름으로 바꿉니다
cors를 설정하여 브라우저에서 업로드할 수 있도록 한다
[
   {
       "AllowedHeaders": [
           "*"
       ],
       "AllowedMethods": [
           "GET",
           "PUT",
           "POST",
           "DELETE"
       ],
       "AllowedOrigins": [
           "*"
       ],
       "ExposeHeaders": []
   }
버킷 권한 설정 메뉴에서 찾을 수 있는 버킷의 교차 소스 공유 (cors)로이 내용을 복사합니다.
Node.js 설치
이 프로젝트는 Next.js 14를 기반으로 개발되었으며, Node.js의 가장 작은 버전은 18.x 이다
시작 항목
npm install
npm run dev
템플릿은 http://localhost:3003에서 실행된다
그림이나 동영상을 선택하여 업로드하십시오. 이제 파일을 업로드한 것을 확인할 수 있습니다.
페이지에서 두 가지 파일 업로드 방법을 지원합니다:
- 업로드:로컬 파일을 선택하려면 업로드 단추를 누르십시오
- 드래그 업로드:그림이나 동영상을 지정된 영역으로 바로 드래그하여 업로드합니다
파일 크기에 따라 자동으로 최적 업로드 배열을 일치시킵니다:
- 샤드 업로드:큰 파일 (> 50mb)에 대해 다중 스레드 병렬 전송, 자동으로 블록 분할을 사용하여 전송 효율을 크게 향상시킵니다
- 사전 서명 url:텍스트 전송에 적합한 url (보통 ≤ 50mb)은 임시 암호화 링크를 통해 안전하고 효율적인 직접 전송을 제공합니다
핵심 원리 소개
자동 최적 업로드 매칭 원리
const BUCKET_NAME = process.env.AWS_BUCKET_NAME!

if (fileSize > 50 * 1024 * 1024) {
			const createMultipartCommand = new CreateMultipartUploadCommand({
				Bucket: BUCKET_NAME,
				Key: key,
				ContentType: contentType,
			})

			const multipartResponse = await s3Client.send(createMultipartCommand)

			return NextResponse.json({
				uploadId: multipartResponse.UploadId,
				key,
				publicUrl: `https://${BUCKET_NAME}.s3.${process.env.AWS_BUCKET_REGION}.amazonaws.com/${key}`,
				multipart: true,
			})
		} else {
			// Presigned URL for direct upload
			const command = new PutObjectCommand({
			Bucket: BUCKET_NAME,
			Key: key,
			ContentType: contentType,
		})

		const uploadUrl = await getSignedUrl(s3Client, command, {
			expiresIn: 300, // 5 minutes, consistent with other presigned URLs
		})

		return NextResponse.json({
			uploadUrl,
			key,
			publicUrl: `https://${BUCKET_NAME}.s3.${process.env.AWS_BUCKET_REGION}.amazonaws.com/${key}`,
			multipart: false,
			fields: {}, // Direct presigned URL doesn't need additional fields
			})
		}
사전 서명 URL 메커니즘
import { NextRequest, NextResponse } from 'next/server'
import { GetObjectCommand } from '@aws-sdk/client-s3'
import { getSignedUrl } from '@aws-sdk/s3-request-presigner'
import { UPLOAD_CONFIG } from '../../../config/upload'
import { s3Client, BUCKET_NAME } from '../../../lib/s3-client'


/**
 * Generate presigned download URL for a single file
 *
 * @param request - Request object containing the following parameters:
 *   - key: S3 object key (file path)
 *   - expiresIn: URL expiration time (seconds), optional, defaults to config value
 *
 * @returns JSON response containing:
 *   - presignedUrl: Presigned download URL
 *   - expiresIn: URL expiration time
 *   - key: Original file key
 */
export async function POST(request: NextRequest) {
  try {
    // Parse request parameters: file key and expiration time
    const { key, expiresIn = UPLOAD_CONFIG.PRESIGNED_URL_EXPIRES } = await request.json()

    // Validate required file key parameter
    if (!key) {
      return NextResponse.json(
        { error: 'Missing key parameter' },
        { status: 400 }
      )
    }

    // Create S3 GetObject command for generating download URL
    const command = new GetObjectCommand({
      Bucket: BUCKET_NAME,
      Key: key,
    })

    // Generate presigned URL, allowing temporary access to S3 object
    const presignedUrl = await getSignedUrl(s3Client, command, {
      expiresIn: expiresIn,
    })

    // Return presigned URL and related information
    return NextResponse.json({
      presignedUrl,
      expiresIn,
      key,
    })
  } catch (error) {
    // Log error and return server error response
    console.error('Error generating presigned URL:', error)
    return NextResponse.json(
      { error: 'Failed to generate presigned URL' },
      { status: 500 }
    )
  }
}
늘 보는 질문
폴더를 업로드할 수 있습니까?
현재 템플릿은 폴더를 직접 업로드하는 것을 지원하지 않지만:
1. 폴더내의 모든 파일을 선택합니다
2. 대량으로 드래그해서 업로드 구역으로 가져갑니다
3. 한 번에 모든 파일을 업로드합니다
업로드한 파일을 어디에 저장합니까?
파일은 aws s3 클라우드 스토리지 서비스에 저장되며 특정 위치는 구성된 버킷에 따라 결정된다.업로드에 성공하면 s3 url을 받게 되며이 주소로 파일에 접근할 수 있다.
어떻게 이미 업로드한 파일을 삭제합니까?
현재 템플릿은 업로드 목록에서 단일 파일 기록만 삭제할 수 있지만 일괄 삭제는 지원되지 않습니다.s3 파일을 대량으로 삭제하려면 관리자에게 문의하거나 aws 콘솔을 사용하십시오.
업로드가 중단되었을 때 다시 시작할 수 있습니까?
일시 정지점 재개는 템플릿에 의해 지원되지 않습니다.