


如何将AWS S3与Pages一起使用?
本指南将帮助您在 EdgeOne Pages 快速上手使用基于 AWS S3 和 Next.js 构建的文件上传系统。
快速开始
使用 EdgeOne Pages 模板部署是从头开始构建和部署 AWS S3 项目的最快方法。您可以在 pages 的模板市场快速找到 AWS S3 Batch Uploader 主题模板开始部署。
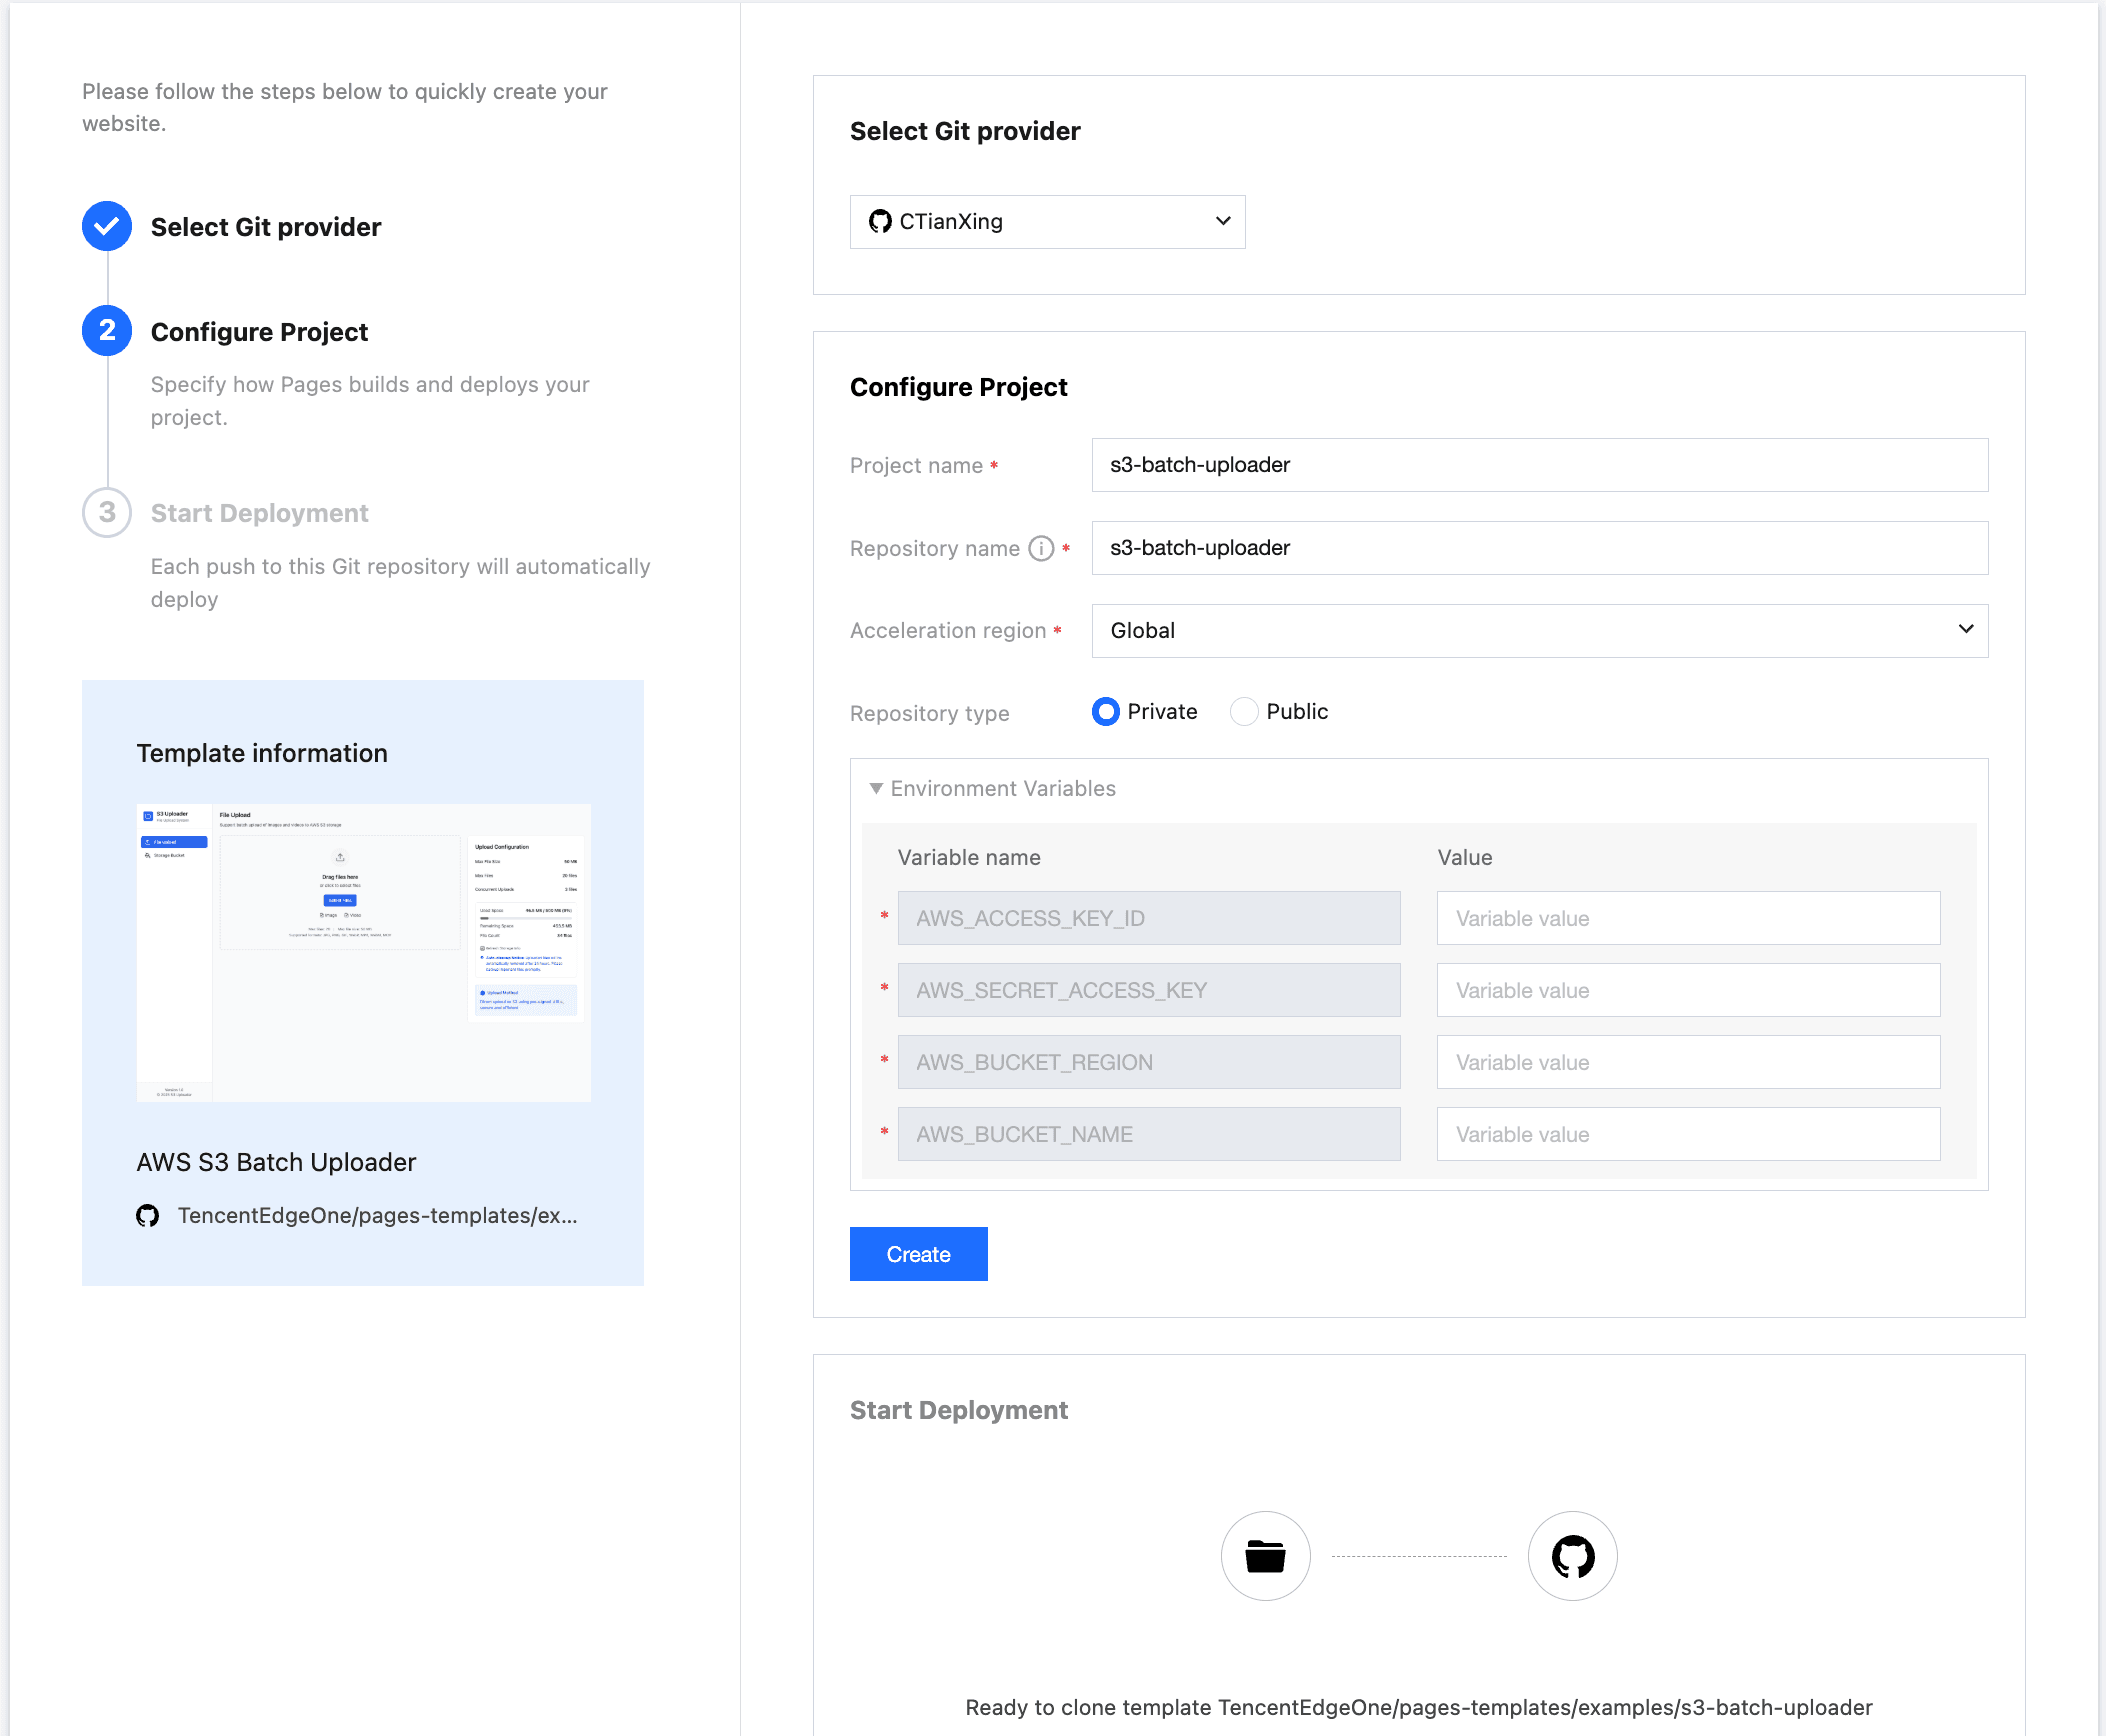
登录您的 AWS S3 账号, 在个人中心-安全凭证菜单下找到访问密钥,将密钥复制到 Environment Variables, 同时将存储桶和存储地域相关信息填入。点击 Create 按钮 Pages 会将模板克隆到您的私有仓库并进行构建。构建完成后,您可以从仓库克隆代码进行开发。
// AWS access key ID
AWS_ACCESS_KEY_ID=your-access-key-id
// AWS secret access key
AWS_SECRET_ACCESS_KEY=your-secret-access-key
// The AWS region to which this client will send requests
AWS_BUCKET_REGION=your-bucket-region
// AWS bucket name
AWS_BUCKET_NAME=your-bucket-name
本地调试
克隆仓库到本地
git clone https://github.com/TencentEdgeOne/pages-templates在仓库pages-templates中找到examples/s3-batch-uploader项目
配置密钥
在 s3-batch-uploader 项目根目录创建一个类似于 .env.example 的 .env.local 文件
登陆您的 AWS S3 账号, 在个人中心-安全凭证菜单下找到访问密钥,将密钥复制粘贴到 .env.local 中,注意只改变 .env.local 文件中的值,不要修改键名否则 AWS S3 SDK 将不能正确初始化。
// AWS access key ID
AWS_ACCESS_KEY_ID=your-access-key-id
// AWS secret access key
AWS_SECRET_ACCESS_KEY=your-secret-access-key
// The AWS region to which this client will send requests
AWS_BUCKET_REGION=your-bucket-region
// AWS bucket name
AWS_BUCKET_NAME=your-bucket-name
配置存储桶策略
{
    "Version": "2012-10-17",
    "Statement": [{
        "Sid": "AllowAccessFromSpecificReferers",
        "Effect": "Allow",
        "Principal": {
            "AWS": "arn:aws:iam::id:root"
        },
        "Action": [
            "s3:DeleteObject",
            "s3:GetObject",
            "s3:ListBucket",
            "s3:PutObject",
            "s3:PutObjectAcl"
        ],
        "Resource": [
            "arn:aws:s3:::your-bucket-name/*",
            "arn:aws:s3:::your-bucket-name"
        ]
    }]
}
将上述策略复制到您的存储桶策略中,在存储桶权限配置菜单中可以找到存储桶策略。
"Principal": {
            "AWS": "arn:aws:iam::id:root"
        }
将上述 Principal.AWS 值中的 id 替换为您账号的 ID
"Resource": [
            "arn:aws:s3:::your-bucket-name/*",
            "arn:aws:s3:::your-bucket-name"
        ]
将上述 Resource 数组中的 your-bucket-name 替换为真实的存储桶名称
配置 CORS,允许从浏览器上传
[
   {
       "AllowedHeaders": [
           "*"
       ],
       "AllowedMethods": [
           "GET",
           "PUT",
           "POST",
           "DELETE"
       ],
       "AllowedOrigins": [
           "*"
       ],
       "ExposeHeaders": []
   }
]将上述内容复制到存储桶的跨源资源共享 (CORS) 中,在存储桶权限配置菜单中可以找到跨源资源共享 (CORS)。
安装 Node.js 18.x
本项目基于Next.js 14 开发,所以支持的 Node.js 最小版本为 18.x
启动项目
npm install
npm run dev
模版运行在 http://localhost:3003
选择图片或视频上传, 此刻你应该可以看到文件上传成功了。
页面支持两种文件上传方式:
- 点击上传:点击上传按钮选择本地文件
- 拖拽上传:直接将图片或视频拖拽至指定区域即可完成上传
系统将根据文件大小自动匹配最优上传方案:
- 分片上传:针对大文件(>50MB)采用多线程并发传输,自动分割文件块,显著提升传输效率
- 预签名URL:适用于小文件传输(通常≤50MB),通过临时加密链接实现安全高效的直传
核心原理介绍
自动匹配最佳上传原理
const BUCKET_NAME = process.env.AWS_BUCKET_NAME!

if (fileSize > 50 * 1024 * 1024) {
			const createMultipartCommand = new CreateMultipartUploadCommand({
				Bucket: BUCKET_NAME,
				Key: key,
				ContentType: contentType,
			})

			const multipartResponse = await s3Client.send(createMultipartCommand)

			return NextResponse.json({
				uploadId: multipartResponse.UploadId,
				key,
				publicUrl: `https://${BUCKET_NAME}.s3.${process.env.AWS_BUCKET_REGION}.amazonaws.com/${key}`,
				multipart: true,
			})
		} else {
			// Presigned URL for direct upload
			const command = new PutObjectCommand({
			Bucket: BUCKET_NAME,
			Key: key,
			ContentType: contentType,
		})

		const uploadUrl = await getSignedUrl(s3Client, command, {
			expiresIn: 300, // 5 minutes, consistent with other presigned URLs
		})

		return NextResponse.json({
			uploadUrl,
			key,
			publicUrl: `https://${BUCKET_NAME}.s3.${process.env.AWS_BUCKET_REGION}.amazonaws.com/${key}`,
			multipart: false,
			fields: {}, // Direct presigned URL doesn't need additional fields
			})
		}
预签名 Url 原理
import { NextRequest, NextResponse } from 'next/server'
import { GetObjectCommand } from '@aws-sdk/client-s3'
import { getSignedUrl } from '@aws-sdk/s3-request-presigner'
import { UPLOAD_CONFIG } from '../../../config/upload'
import { s3Client, BUCKET_NAME } from '../../../lib/s3-client'


/**
 * Generate presigned download URL for a single file
 *
 * @param request - Request object containing the following parameters:
 *   - key: S3 object key (file path)
 *   - expiresIn: URL expiration time (seconds), optional, defaults to config value
 *
 * @returns JSON response containing:
 *   - presignedUrl: Presigned download URL
 *   - expiresIn: URL expiration time
 *   - key: Original file key
 */
export async function POST(request: NextRequest) {
  try {
    // Parse request parameters: file key and expiration time
    const { key, expiresIn = UPLOAD_CONFIG.PRESIGNED_URL_EXPIRES } = await request.json()

    // Validate required file key parameter
    if (!key) {
      return NextResponse.json(
        { error: 'Missing key parameter' },
        { status: 400 }
      )
    }

    // Create S3 GetObject command for generating download URL
    const command = new GetObjectCommand({
      Bucket: BUCKET_NAME,
      Key: key,
    })

    // Generate presigned URL, allowing temporary access to S3 object
    const presignedUrl = await getSignedUrl(s3Client, command, {
      expiresIn: expiresIn,
    })

    // Return presigned URL and related information
    return NextResponse.json({
      presignedUrl,
      expiresIn,
      key,
    })
  } catch (error) {
    // Log error and return server error response
    console.error('Error generating presigned URL:', error)
    return NextResponse.json(
      { error: 'Failed to generate presigned URL' },
      { status: 500 }
    )
  }
}
常见问题
可以上传文件夹吗?
目前模板不支持直接上传文件夹,但您可以:
1. 选择文件夹内的所有文件
2. 批量拖拽到上传区域
3. 一次性上传所有文件
上传的文件存储在哪里?
文件存储在 AWS S3 云存储服务中,具体位置由配置的存储桶决定。上传成功后您会获得一个 S3 URL,可以通过该地址访问文件。
如何删除已上传的文件?
当前模板仅支持从上传列表中移除单个文件记录,不支持批量删除。如需批量删除 S3 文件,请联系管理员或使用 AWS 控制台。
上传中断后可以续传吗?
模板目前不支持断点续传。